The Fail-Proof 'V' Technique for Choux Paste and Other Secrets

The Mystique of Choux Pastry: Demystified
Choux pastry, the foundation for delightful treats like airy cream puffs, elegant éclairs, and savory gougères, often carries a reputation for being finicky. Many home bakers shy away, worried about flat, sad pastries instead of the light, hollow marvels they envision. But what if I told you the secret to consistent success isn't just about precise measurements, but about learning to read your dough? That's right, once you tune into a few key visual and textural cues, choux pastry transforms from a challenging endeavor into one of the most reliable and rewarding doughs you can master.
At its heart, choux pastry is deceptively simple: water, butter, flour, and eggs. The magic truly happens in the oven. When baked, the high water content in the dough turns into steam, which rapidly expands, puffing up the pastry and creating that characteristic hollow interior. This relies on the dough having just the right balance of moisture and structure – enough moisture to create steam, and enough structure to trap it. And that's where our visual cues come in, especially the famous 'V' test.
Pro Tip: Don't be afraid to experiment! Choux pastry is forgiving once you understand its fundamental principles.
The Crucial First Step: Drying the Panade
Before we even think about eggs, we need to create what's called the panade – the cooked mixture of water (or milk), butter, flour, and sometimes a pinch of sugar and salt. This step is absolutely critical and often overlooked. You'll combine your liquid and fat in a saucepan, bring it to a boil, then quickly dump in all your flour at once, stirring vigorously with a wooden spoon.
Initially, it will look lumpy and messy, but keep stirring. The goal here is twofold: to cook out the raw flour taste and, more importantly, to dry out the dough. You're trying to evaporate excess moisture from the mixture so that when you add the eggs later, they don't make the dough too loose.
How to know it's ready? Keep stirring and cooking over medium heat. You'll notice the dough begin to form a cohesive ball, pulling away cleanly from the sides of the pan. Even more importantly, a thin film will form on the bottom of the saucepan. This film is your visual cue that enough moisture has cooked off. This process usually takes 2-3 minutes of active stirring after the flour is incorporated.
Once it's properly dried, immediately transfer the hot panade to a stand mixer bowl (or a large mixing bowl if you're doing it by hand). This allows the dough to cool down slightly before the eggs are added, preventing them from scrambling. Let it cool for 5-10 minutes, or until it's just warm to the touch – you should be able to comfortably touch the dough without burning your finger.
The Heart of the Matter: The 'V' Test Explained
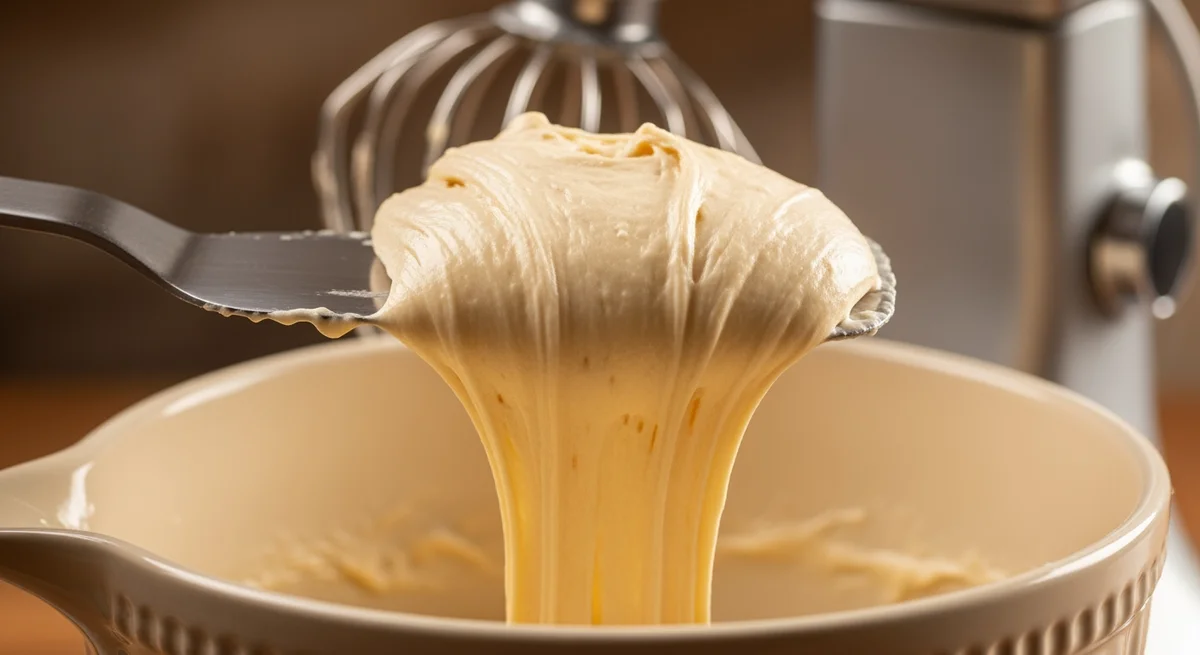
Now for the most pivotal stage: incorporating the eggs. This is where you bring your panade to life, transforming it from a thick, cooked dough into a smooth, glossy, pipeable batter. And this is where the 'V' test becomes your ultimate guide.
Eggs are added gradually, one at a time, to the cooled panade. Beat each egg lightly before adding, and mix it in thoroughly until it's completely absorbed before adding the next. This allows you to control the consistency precisely. You might not use all the eggs a recipe calls for, or you might need a tiny bit more – it all depends on how much moisture evaporated in the previous step and the size of your eggs.
Performing the 'V' Test:
-
Stop mixing once the dough looks smooth and shiny, but still quite thick.
-
Lift your spatula or mixer paddle (make sure it's clean of excess dough).
-
Observe the dough as it slowly falls back into the bowl.
What you're looking for: The perfect choux pastry dough will form a smooth, glossy 'V' shape (or a thick, inverted triangle) at the end of your spatula. This 'V' should slowly detach and fall back into the bowl. It shouldn't snap off abruptly, nor should it pour off like a liquid. It's a graceful, deliberate drop, leaving behind a soft, pointed peak on the spatula.
Why the 'V' is Your Best Friend:
-
Too Stiff (Not enough eggs): If the dough clings stubbornly to the spatula and breaks off in clumps, or if the 'V' is very blunt and doesn't release easily, it means your dough is too stiff. This dough won't expand properly in the oven, resulting in dense, heavy pastries that lack that characteristic hollow interior. Add another half-beaten egg, mix, and re-test.
-
Too Runny (Too many eggs): If the dough slides off the spatula too quickly, doesn't hold any discernible shape, or resembles a thick batter rather than a paste, it's too wet. This is the trickier problem to fix, as you can't easily remove moisture. Over-hydrated dough won't hold its shape when piped and will likely collapse in the oven. This is why adding eggs gradually is so important. If this happens, you might be able to salvage it by cooking a small fresh batch of
panade(without eggs) and gradually mixing it into your wet dough to stiffen it up – but it's often easier to start over. -
Just Right (The Perfect 'V'): This consistency is the sweet spot. The dough is soft enough to pipe beautifully, yet robust enough to hold its shape and expand dramatically in the oven. It has elasticity and a gorgeous sheen.
Beyond the 'V': Piping and Baking Perfection
Once your choux dough passes the 'V' test, it's ready for its destiny! Transfer it to a piping bag fitted with your desired nozzle (a plain round tip is common for cream puffs and éclairs, or a star tip for churros).
Piping Tips:
-
Pipe directly onto a parchment-lined baking sheet.
-
Leave enough space between each pastry for expansion.
-
For cream puffs, pipe round mounds. For éclairs, pipe elongated logs.
-
Smooth any peaks with a wet finger before baking.
Baking Secrets:
-
High Heat First: Start with a relatively high oven temperature (e.g.,
400°F / 200°C) for the first10-15 minutes. This creates a powerful burst of steam, causing the pastry to puff rapidly. -
Lower and Dry: Reduce the temperature (e.g., to
350°F / 175°C) and continue baking until the pastries are deeply golden brown and feel light and hollow. This slower baking helps to dry out the interior, preventing them from collapsing when they cool. -
No Peeking! Resist the urge to open the oven door during the first
20-25 minutesof baking. This lets out crucial steam and can cause your pastries to deflate. -
Pierce and Dry (Optional but Recommended): For truly crisp choux, once they're baked and golden, you can turn off the oven, pierce each pastry with a small knife or skewer to release any remaining steam, and leave them in the cooling oven for
10-15 minuteswith the door slightly ajar. This further dries them out.
Your Choux Creations Await!
With a perfect batch of choux pastry, your culinary world opens up! Imagine delicate cream puffs filled with vanilla pastry cream, elegant éclairs adorned with chocolate ganache, savory gougères bursting with cheese, or even crispy churros. The possibilities are endless.
Trust me, the first time your choux pastries emerge from the oven, puffed and golden, you'll feel like a true pastry chef. It's a skill that builds confidence and delivers incredible results, all thanks to understanding those simple, yet powerful, visual cues like the 'V' test. So, grab your saucepan, get ready to stir, and prepare to master the magic of choux!