Build Your Own Rustic Ground BBQ Pit: The Ultimate Back-to-Basics Guide

Embrace the Flame: Why a Rustic Ground BBQ Pit is Your Next Backyard Project
There's a primal magic to cooking over an open fire that a regular grill just can't replicate. The crackle of wood, the dance of flames, and that incredible smoky aroma that infuses everything it touches – it's an experience, not just a meal. If you're craving that authentic open-fire sizzle and want to transform your backyard into a truly rustic BBQ sanctuary without the headache of cement, mortar, or a massive construction project, this guide is your game-changer.
This method is simple, budget-friendly, and gives your gathering that raw, traditional vibe that everyone loves. It harks back to simpler times, inviting connection, conversation, and some seriously delicious food. Forget complicated setups; sometimes, the best flavors come from the most basic approaches. Let's dig in and build your very own ground-fire pit!
The Allure of Open-Fire Cooking
Before we get our hands dirty, let's appreciate why this method is so compelling. Cooking over a ground pit isn't just about grilling; it's about an experience. It evokes the spirit of Argentine asados, Australian camp ovens, or traditional pit cooking from cultures around the world. It encourages slower cooking, more communal participation, and a deeper appreciation for the food and the process. The radiant heat from the bricks, combined with the smoky flavor from real wood, creates a taste profile that's simply unparalleled.
Step-by-Step: Building Your Rustic Ground BBQ Pit
This isn't about creating a permanent fixture, but a practical, sturdy, and fast setup that you can enjoy for countless cooks. Here’s how to bring that vision to life:
-
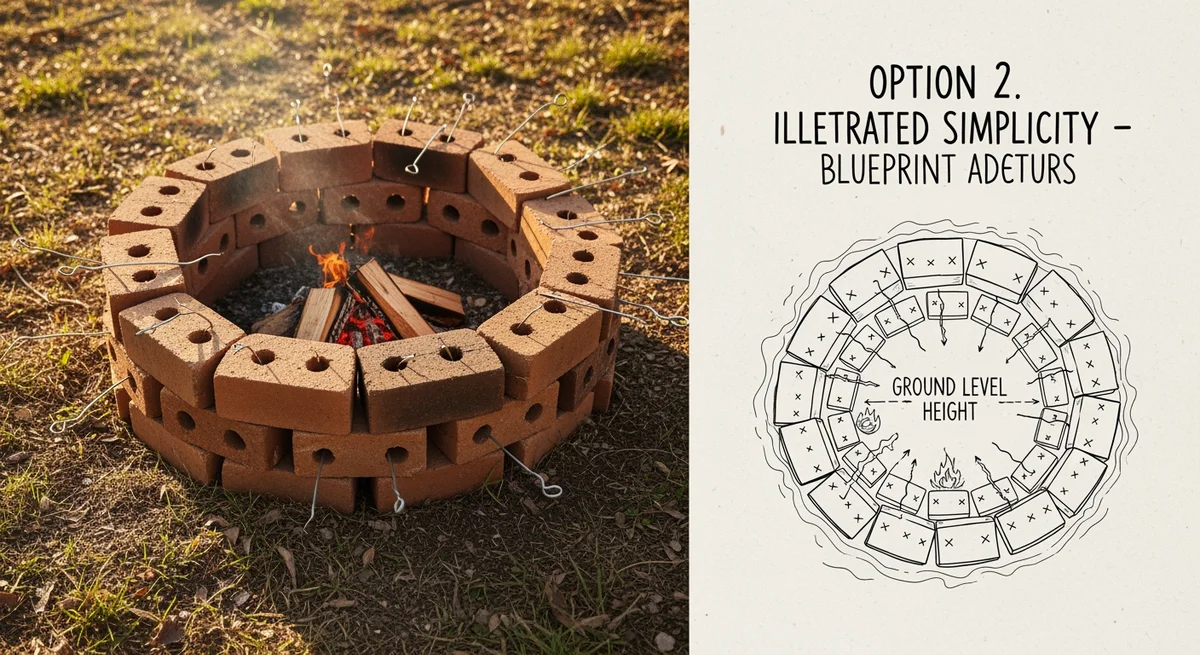
Prep the Ground: Pick a flat, clear spot in your yard, far from anything flammable (trees, fences, buildings). Clear away any grass, leaves, or debris. Use a skewer or a garden tool to scratch a perfect circle on the ground—this will be your layout guide for the pit's perimeter. Aim for a diameter that suits your cooking needs, typically
2-3 feetfor a good family-sized pit. -
The Brick Base: Dig a shallow trench, roughly
2-3 inchesdeep, following the circle you just drew. This small groove is crucial; it provides the initial stability and a secure footing for your first layer of bricks, preventing them from shifting once the fire gets going. -
Positioning: Take about 20 solid bricks (the ones without holes are ideal for maximum heat retention and durability, often called 'common bricks' or 'engineering bricks'). Stand them upright, side-by-side, following the circular path of your trench. Keep them tight together to create a continuous wall that traps heat effectively and shields your fire from the wind. This upright positioning gives you a good height to lean skewers against.
-
Locking with Gravel: Here's the secret to skipping the cement: gravel or coarse sand. This simple material acts as a natural mortar, wedging the bricks firmly into place. Pour a generous amount of gravel around the base of the bricks, both inside and out. Use a rubber mallet or a sturdy piece of wood to tamp them down firmly. You'll feel the bricks become incredibly stable as the gravel settles around them. This technique creates a secure, yet easily disassembled, structure.
-
Height Adjustment (Optional): If you desire more wind protection, want to elevate your cooking surface, or need a higher base for longer skewers, you can slightly tilt the bricks inward for a wider top opening, or even add a second layer of bricks on top of the first. For a second layer, simply stack them staggering the joints, and then tamp more gravel around the base of the new layer. Just ensure the overall structure remains stable and safe for your intended use.
Why This Method Rocks: Beyond the Basics
This simple pit offers some incredible advantages:
- Superior Heat Control: The brick wall isn't just for aesthetics; it retains and radiates heat beautifully, creating a consistent cooking zone. You can easily spread your coals evenly for direct heat or push them to one side for a more indirect roast.
- Unmatched Versatility: You can easily adjust the angle of your skewers by leaning them directly against the brick rim, moving the meat closer to or further from the fire to get that perfect char. This allows for incredible precision in cooking different cuts simultaneously.
- Zero-Waste Cost (Almost!): Besides the bricks (which can often be sourced affordably or even reclaimed) and a bit of gravel, all you need is some good cooking wood and a bit of "gaucho" spirit! It's an environmentally conscious and budget-friendly way to enjoy gourmet-level BBQ.
- Authentic Flavor Profile: The direct exposure to wood smoke and the even, radiant heat from the bricks imparts a depth of flavor that's hard to achieve with conventional grills.
- Ambiance Builder: There's nothing quite like gathering around an open fire, watching the flames, and smelling dinner cook. It creates an unforgettable atmosphere.
Mastering Your Flame: Pro Tips for Ground-Pit Cooking
Building the pit is just the beginning. Here's how to get the most out of your new cooking setup:
- Choose Your Wood Wisely: Not all wood is created equal for cooking. Opt for hardwoods like oak, hickory, mesquite, apple, or cherry for long-lasting coals and excellent flavor. Avoid softwoods like pine or fir, as they burn quickly, create too much ash, and can impart an unpleasant resinous flavor.
- Start Small, Build Hot Coals: Don't try to cook over roaring flames. The ideal cooking fuel is a bed of hot, glowing coals. Start a small fire, let it burn down, then add more wood to build up your coal bed. This provides consistent, even heat without charring your food on the outside while leaving it raw inside.
- Essential Tools: Long-handled tongs are a must. A fire poker or a small shovel is invaluable for moving coals around. Heat-resistant gloves will protect your hands, and a spray bottle of water can help manage flare-ups.
- Skewers are Your Best Friend: Long metal or sturdy bamboo skewers are perfect for this setup. You can roast everything from chunks of meat and vegetables to whole fish directly over the coals.
- Consider a Grill Grate: While the lean-and-rotate method is fantastic, you can also support a simple metal grill grate across the top of your pit with extra bricks if you prefer a more traditional grilling surface for burgers, steaks, or smaller items.
- Dutch Oven Magic: A cast-iron Dutch oven nestled directly into the coals can create incredible stews, baked beans, or even rustic breads. The radiant heat cooks food evenly from all sides.
Safety First, Always!
Cooking with open fire demands respect and caution:
- Location, Location, Location: Ensure your pit is on bare earth or gravel, far away from any structures, overhanging branches, dry grass, or other flammable materials. Maintain a clear radius of at least
10 feet. - Wind Conditions: Avoid using your pit on very windy days, as embers can easily blow and start unintended fires.
- Water/Sand Nearby: Always have a bucket of water, a hose, or a shovel with sand readily available to extinguish any escaped embers or a runaway fire.
- Never Leave Unattended: A fire pit should never be left unsupervised, especially when children or pets are around.
- Extinguish Thoroughly: When you're done cooking, ensure the fire is completely out. Douse the coals with water and stir them to ensure no hot spots remain.
Ready to Fire it Up?
Now that your rustic ground BBQ pit is ready, the real fun begins! Prep your favorite cut of meat – perhaps some marinated chicken skewers, a whole roasted pork loin, or even some corn on the cob. Gather your friends and family, light that fire, and enjoy the sights, sounds, and incredible smells of a truly traditional, open-fire roast. This isn't just cooking; it's an event, a return to basics, and a guarantee of delicious memories. Happy grilling, and enjoy the journey back to the roots of barbecue!